Showing posts with label Reversible Zippered Pillow. Show all posts

Thursday, May 23, 2024

Summersault Pillows

Hello! Today I'm sharing reversible pillows I made with the Summersault Block Party Multi Panel available at Missouri Star Quilt Company.  

Don't forget to use my Missouri Star Quilt Company affiliate link (here) to save 20% off orders $50+


This project is so quick because the Summersault - Block Party Multi Panel includes (4) 20" quilt block panels of two butterflies and two months.  I simply quilted all four panels then used my Reversible Pillow Tutorial (here) to finish both pillows.  Super quick and easy!

Supplies for (2) Summersault Pillows


Day or Night Decor:
For each pillow I used (1) Butterly and (1) Moth panel so the pillows could be reversed appropriately to correct time of day. Now my daughter can decided if she wants Daytime Butterflies or Evening Moths!


When making reversible pillows, I prefer to insert the zipper at bottom of the pillow. This way the zipper is hidden and makes the pillow truly reversible. 


I loved creating these fun summer pillows! They will definitely brighten up your decor!


Don't forget to use my Missouri Star Quilt Company affiliate link to save 20% off orders $50+

and

Reversible Pillow Tutorial (here)


Be sure to follow me on Instagram @ABitofScrapStuff and on my A Bit of Scrap Stuff Blog for more fabric fun!

Have a great day and happy quilting! 


Melanie Call


to save an extra 20% off your $50+ order! (click here or image above)
#msqcshowandtell #msqcpartner


Friday, July 7, 2023

Camp S'more Pillow Fun

A Bit of Scrap Stuff Blog #ABitofScrapStuff #RileyBlakeDesigns

Hi Friends!  Today is all about pillows using the fabulous new collection: Camp S'mores by Hershey with Riley Blake Designs. S'mores and sewing is the most perfect combination of happiness! 

Shop Fabric at Fat Quarter Shop

A Bit of Scrap Stuff Blog #ABitofScrapStuff #RileyBlakeDesigns

Pillow Party Time 

Ready to chat about pillows. Sewing pillow cases and decor pillows are my favorite projects because they can be finished in an afternoon and are an affordable project - yay! Plus the pillowcase pattern is a free pattern by Riley Blake Designsand the Reversible Zipper Pillow is a free tutorial on my blog.

A Bit of Scrap Stuff Blog #ABitofScrapStuff #RileyBlakeDesigns

My daughter is so excited for our matching Camp S'mores pillowcases for our next Girl Scout camp out! This project is super quick to make and will definitely bring sweet dreams.

Save 15% off your order at Missouri Star Quilt Co by using this link.

Roll Up Pillow Case 

Supplies for one pillow

  • Roll Up Pillow Case free pattern - here
  • 3/4 yard Main Fabric: Camp S'mores Main Green
  • 1/4 yard Cuff Fabric (9" x WOF) : Camp S'mores Text Marshmallow or Chocolate
  • 2.25" x WOF Trim Fabric: Lori Holt Shabby Fabric Leaf

Tips:

  • Pattern step 4. I did not finish the raw edge of the seam with a zig-zag or overcast stitch because this seam will be hidden.
  • Pattern step 7b. I recommend making the French seam option to avoid exposed seams

A Bit of Scrap Stuff Blog #ABitofScrapStuff #RileyBlakeDesigns

Accuquilt Dynamic Promo

Camp S'mores Panel

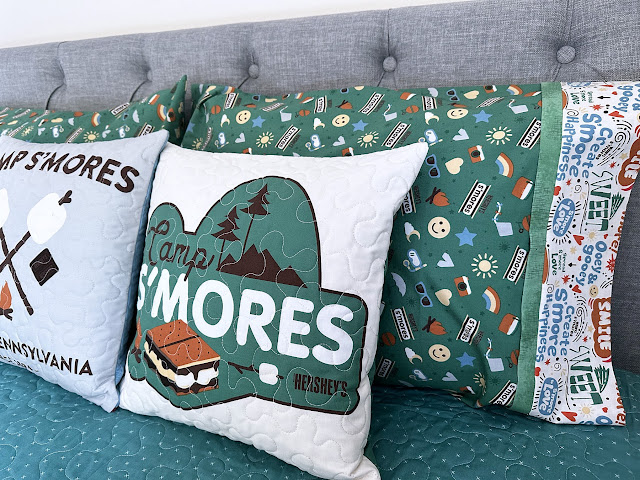
I love panels! If a fabric collection has an included panel, I always need it plus Riley Blake Designs panels are such fantastic quality. I use panels for an easy quilt or quilt backing or bags or decor pillows ... so many options! The Camp S'mores Panel is sooooo perfect for decor pillows. 


Reversible Zipper Pillows 16" x 16" 

To make my Decor Pillows - I used my free tutorial: Reversible Zipper Pillow on my A Bit of Scrap Stuff Blog (here). 

I made a few changes to my tutorial to make it a bit quicker since I was using all four squares on the panel. 

  • ONLY trim off the Hershey plaid top and bottom of panel.
  • Make a quilt sandwich - Panel plus batting plus backing fabric. My backing is Lori Holt Bee Ginghams Jennifer Alpine - this will be hidden inside pillow, but I still wanted mine to be cute.
  • Machine quilt as desired. I chose a meander free motion design.
  • Cut each square to 16.5" x 16.5" 
  • Start at Step 2 of my Reversible Zipper Pillow Tutorial (here)
  • Camp S'mores Reversible Zipper Pillow will finish at 16" x 16" (instead of 18" x 18" as noted in blog tutorial)
A Bit of Scrap Stuff Blog #ABitofScrapStuff #RileyBlakeDesigns

I chose to make two pillows that are reversible! Of course, you can easily make four pillows - just choose a coordinating print from Camp S'mores for the reverse side! 
A Bit of Scrap Stuff Blog #ABitofScrapStuff #RileyBlakeDesigns

I hope you have fun making Camp S'mores Decor Pillows plus Pillowcases for your home or next camping trip or cabin or camper! Be prepared for sweet dreams!

A Bit of Scrap Stuff Blog #ABitofScrapStuff #RileyBlakeDesigns

Don't forget to follow me at A Bit of Scrap Stuff Blog and Instagram @ABitofScrapStuff for more sewing fun!

Melanie Call


Shop Fabric at Fat Quarter Shop


This post contains affiliate links. Thank you for supporting A Bit of Scrap Stuff. My family appreciates it!


Accuquilt Dynamic Promo 
  Shop Fabric at Fat Quarter Shop


Monday, May 2, 2022

JANOME TUTORIAL - Reversible Zippered Pillow in 15 minutes!


A Bit of Scrap Stuff Blog #ABitofScrapStuff #Janome #JanomeMaker #RileyBlakeDesigns #tutorial

Hi Sewing Friends! Today I'm excited to share a tutorial for a Reversible Zippered Pillow that you can sew in 15 minutes, which includes installing a zipper! Don't worry if zippers make you nervous ... this method is super easy!

I'll be making my Reversible Zippered Pillow with my fabulous Janome M7 sewing machine. 

A Bit of Scrap Stuff Blog #ABitofScrapStuff #Janome #JanomeMaker #RileyBlakeDesigns #tutorial

I absolutely LOVE to sew pillows for my home! A pillow is an easy and affordable home decor project. Plus this reversible pillow can be made in 15 minutes - hooray! 

The Reversible Zippered Pillow is perfect for your fabric stash of panels, cheater prints, or large scale prints that you don't want to cut into tiny pieces! Today I'm using the Flea Market Fabric collection designed by Lori Holt for Riley Blake Designs. I just LOVE this cheater print!!!


Fat Quarter Shop Quilting Fabric, Kits, Notions and Patterns

A Bit of Scrap Stuff Blog #ABitofScrapStuff #Janome #JanomeMaker #RileyBlakeDesigns #tutorial

Installing a zipper into my pillow cover is a must sew detail for me. My pillows are used by my three kids so I need to be able to remove the pillow cover and wash it.   Apparently Mom's handmade pillows are the best for laying on while relaxing ;). 

It's Tutorial Time .....  
PS - Adding optional details of quilting your pillow exterior fabric and/or overcasting your seams may add a bit of extra time, but so worth it!

Reversible Zippered Pillow Tutorial

A Bit of Scrap Stuff Blog #ABitofScrapStuff #Janome #JanomeMaker #RileyBlakeDesigns #tutorial


Supplies:
Optional Feet:
  • Janome AcuFeed Single Foot holder 9mm VD
  • Janome AcuFeed Zipper Foot (single) 9mm ED
  • Janome Overcasting Foot - M
  • Janome Free Motion/ Darning Foot
A Bit of Scrap Stuff Blog #ABitofScrapStuff #Janome #JanomeMaker #RileyBlakeDesigns #tutorial

Note: You may choose to assemble your pillow using the Janome 1/4" O foot and Zipper E Foot OR the AcuFeed Single Foot Holder VD and Zipper ED Foot. I would recommend using the AcuFeed foot for bulky fabrics or if you like the extra control with the AcuFeed system. I will be using the  Janome 1/4" O foot and Zipper E Foot for the tutorial as they are common feet for all Janome Machines.


Step 1: Fuse Pellon Fusible Fleece to wrong side of exterior fabric per manufacturer instructions. 

OPTIONAL: Free motion quilt with Janome Free Motion/Darning Foot OR use the AcuFeed Flex VD Foot to quilt straight lines on Exterior Fabrics.

Step 2: Place zipper right side down along bottom edge of Pillow Front Exterior Fabric. Use Wonder Clips or pins to hold zipper in place.  
  • Hint: As zipper is oversized and nylon, you may have zipper ends overhang one or both side(s) of the pillow edge. Be sure that the metal zipper stops are not within 1/2" of pillow edge or you may accidentally sew over the metal zipper stops, which will make you and your machine unhappy.

A Bit of Scrap Stuff Blog #ABitofScrapStuff #Janome #JanomeMaker #RileyBlakeDesigns #tutorial

Step 3: Attach Janome Zipper Foot E and move needle position to left. I like to use Stitch 4 on my Janome M7.  Line edge of zipper foot along edge of zipper tape and sew zipper to Pillow Exterior Front. Seam allowance is 1/4" - 3/8" (may vary based on width of zipper foot and/or how far left needle is)

A Bit of Scrap Stuff Blog #ABitofScrapStuff #Janome #JanomeMaker #RileyBlakeDesigns #tutorial


Step 4: Place Pillow Exterior (front and back) RIGHT sides together. Align bottom edge of Pillow Exterior Back to unattached zipper side. Make sure Pillow Exterior right and left sides are aligned. Use Wonder Clips or pins to hold zipper in place.  

A Bit of Scrap Stuff Blog #ABitofScrapStuff #Janome #JanomeMaker #RileyBlakeDesigns #tutorial

Step 5: Line edge of zipper foot along edge of zipper tape and sew zipper to Pillow Exterior Back. (Refer to Janome M7 setting in Step 3.

A Bit of Scrap Stuff Blog #ABitofScrapStuff #Janome #JanomeMaker #RileyBlakeDesigns #tutorial

The zipper should now be installed along the bottom edge of Pillow Exterior Front and Back.

A Bit of Scrap Stuff Blog #ABitofScrapStuff #Janome #JanomeMaker #RileyBlakeDesigns #tutorial

OPTIONAL Step 6: Attach Overcasting M Foot. Overcast both seams along zipper tape edge. This optional step takes just a few minutes, but makes your pillow interior look much nicer and prevents fraying of Exterior Fabric. I used Overcasting Stitch 16 factory settings on my Janome M7.

A Bit of Scrap Stuff Blog #ABitofScrapStuff #Janome #JanomeMaker #RileyBlakeDesigns #tutorialA Bit of Scrap Stuff Blog #ABitofScrapStuff #Janome #JanomeMaker #RileyBlakeDesigns #tutorial


Step 7:  With Pillow Exterior Fabrics  RIGHT sides together, place pillow with Pillow Exterior Back Fabric on top. Make sure zipper is laying down completely flat. Open zipper half way. Use Wonder Clips to hold Pillow Exterior Fabrics together to avoid shifting when sewing exterior sides together.
  • Note: If Pillow Exterior Back top edge of fabric is slightly longer than Pillow Exterior Front when zipper is laying flat on pillow backing - trim off excess fabric (there should not be more than 1/4" of excess fabric)

A Bit of Scrap Stuff Blog #ABitofScrapStuff #Janome #JanomeMaker #RileyBlakeDesigns #tutorial

A Bit of Scrap Stuff Blog #ABitofScrapStuff #Janome #JanomeMaker #RileyBlakeDesigns #tutorial


Step 8: Attach 1/4" O Foot. Move needle position to 1/4" (Quilt Menu - Stitch 2). Sew 1/4" seam allowance along pillow right/left sides and top. Be sure to backstitch when starting and stopping.  
  • Hint: I like to start stitching where the zipper is so when I back stitch, I am also securing the edge of my zipper closed. 

A Bit of Scrap Stuff Blog #ABitofScrapStuff #Janome #JanomeMaker #RileyBlakeDesigns #tutorial

A Bit of Scrap Stuff Blog #ABitofScrapStuff #Janome #JanomeMaker #RileyBlakeDesigns #tutorial


OPTIONAL Step 9: Attach Overcasting M Foot. Overcast side and top seams. This optional step takes just a few minutes, but makes your pillow interior look much nicer and prevents fraying of Exterior Fabric. I used Overcasting Stitch 16 factory settings on my Janome M7. See image in Step 6.

A Bit of Scrap Stuff Blog #ABitofScrapStuff #Janome #JanomeMaker #RileyBlakeDesigns #tutorial

A Bit of Scrap Stuff Blog #ABitofScrapStuff #Janome #JanomeMaker #RileyBlakeDesigns #tutorial

Step 10: Clip excess fabric from top corners of pillow. Do not cut through sewn line. 
Turn pillow inside out and enjoy!
A Bit of Scrap Stuff Blog #ABitofScrapStuff #Janome #JanomeMaker #RileyBlakeDesigns #tutorial


A Bit of Scrap Stuff Blog #ABitofScrapStuff #Janome #JanomeMaker #RileyBlakeDesigns #tutorial

I hope you choose your favorite fabrics and make yourself (or a friend) a new pillow to enjoy!

A Bit of Scrap Stuff Blog #ABitofScrapStuff #Janome #JanomeMaker #RileyBlakeDesigns #tutorial


Be sure to follow me on Instagram @ABitofScrapStuff and on my A Bit of Scrap Stuff Blog for more fabric fun!

Happy Sewing!

Melanie Call

Fat Quarter Shop Quilting Fabric, Kits, Notions and Patterns


Sulky.com 

 This post contains affiliate links. Thank you for supporting A Bit of Scrap Stuff. My family appreciates it!