Wednesday, June 29, 2022

Echo Quilt - Pixie Noel 2

A Bit of Scrap Stuff Blog #ABitofScrapStuff #ABitofScrapStuffPattern #EchoQuilt #RileyBlakeDesigns #Quilt #PixieNoel2Fabric #TashaNoel #christmasquilt

Hi Quilty Friends!  I’m super excited to share my new Echo Quilt featuring the fabulous Pixie Noel 2 Fabric Collection designed by Tasha Noel for Riley Blake Designs. Plus this quilt has a bonus backing surprise ;) ... so keep on reading!

I was sooooo excited to learn that Pixie Noel 2 was being released as I loved Pixie Noel (the original) and still have a few favorite pieces in my stash! Just look at this adorable collection - pixies, stockings, woodland critters, snow, florals, and stripes.

Shop Fabric at Fat Quarter Shop

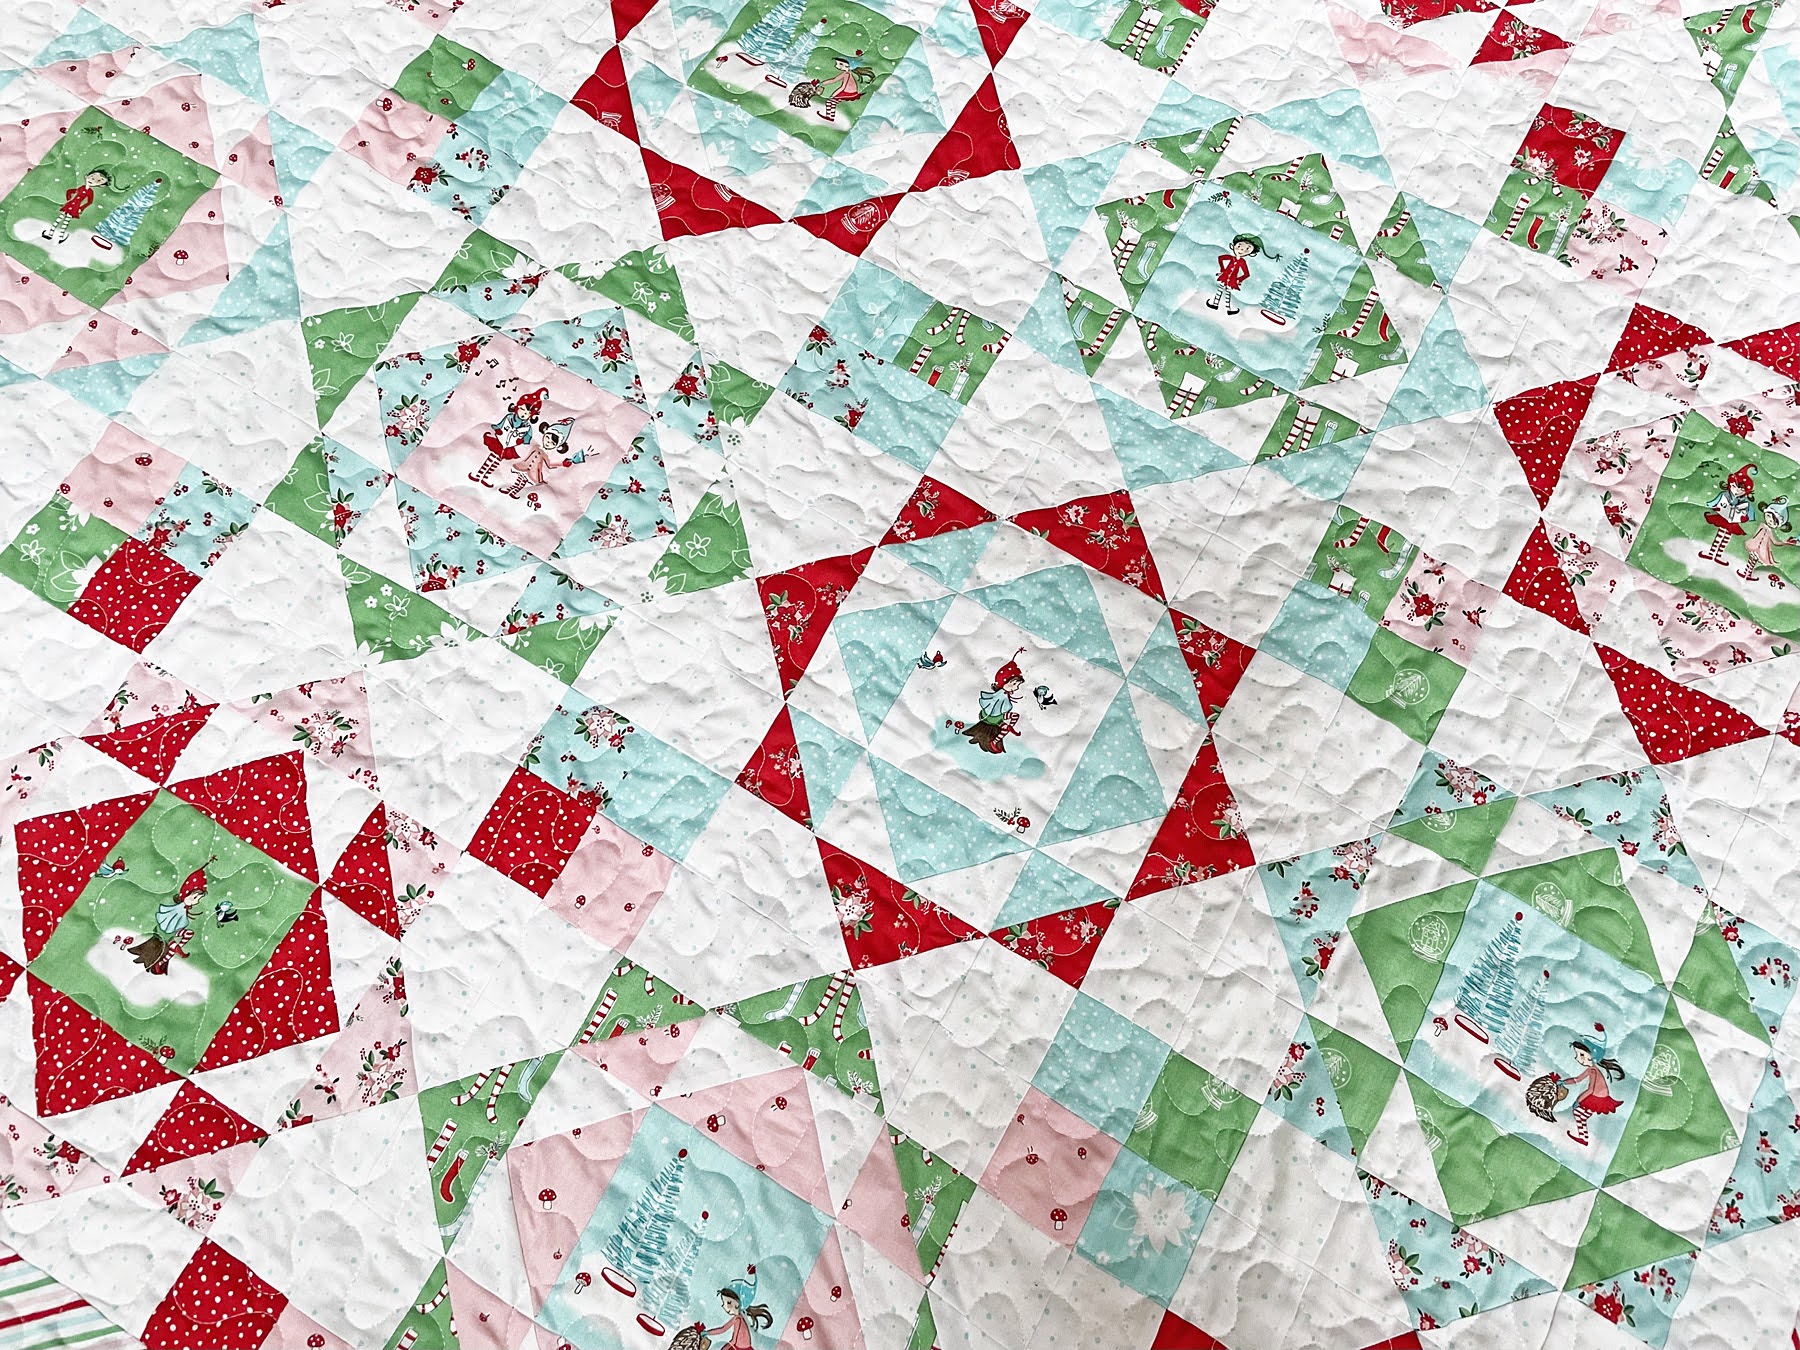
I absolutely love the colors of Pixie Noel 2. Adding aqua and pink into a Christmas Collection makes the project more fresh and modern - which I love! Plus Tasha's illustrations are fabulous so I had to fussy cut the center square for each Echo Quilt Block using the Pixie Noel 2 Main Print in all 4 color ways!

A Bit of Scrap Stuff Blog #ABitofScrapStuff #ABitofScrapStuffPattern #EchoQuilt #RileyBlakeDesigns #Quilt #PixieNoel2Fabric #TashaNoel #christmasquilt

My favorite tools for perfectly fussy cut blocks.

A Bit of Scrap Stuff Blog #ABitofScrapStuff #ABitofScrapStuffPattern #EchoQuilt #RileyBlakeDesigns #Quilt #PixieNoel2Fabric #TashaNoel #christmasquilt

Echo Quilt Supplies 60.5" x 60.5" - Pixie Noel 2 

Clickable links below 

Accuquilt Dynamic Promo

The Echo Quilt Pattern is written for traditional rotary cutting PLUS I include the AccuQuilt GO! dies needed if your prefer. I personally LOVE to use my AccuQuilt dies because then my blocks are perfect and no trimming needed! Just look at the perfectly cut fabric!

A Bit of Scrap Stuff Blog #ABitofScrapStuff #ABitofScrapStuffPattern #EchoQuilt #RileyBlakeDesigns #Quilt #PixieNoel2Fabric #TashaNoel #christmasquilt


A Bit of Scrap Stuff Blog #ABitofScrapStuff #ABitofScrapStuffPattern #EchoQuilt #RileyBlakeDesigns #Quilt #PixieNoel2Fabric #TashaNoel #christmasquilt


Here is a close up of a few of the blocks before I quilted them! It was so fun selecting the fabrics for each block!

A Bit of Scrap Stuff Blog #ABitofScrapStuff #ABitofScrapStuffPattern #EchoQuilt #RileyBlakeDesigns #Quilt #PixieNoel2Fabric #TashaNoel #christmasquiltA Bit of Scrap Stuff Blog #ABitofScrapStuff #ABitofScrapStuffPattern #EchoQuilt #RileyBlakeDesigns #Quilt #PixieNoel2Fabric #TashaNoel #christmasquilt

Did you see the AMAZING Panel that is in the Pixie Noel 2 Collection??? This adorable quilt panel was perfect to make my quilt reversible! I simply added borders to the sides of the panel until it was the size I needed. This is a great way to use up all of your fabric scraps if you order a half-yard bundle instead of a fat-quarter bundle.

A Bit of Scrap Stuff Blog #ABitofScrapStuff #ABitofScrapStuffPattern #EchoQuilt #RileyBlakeDesigns #Quilt #PixieNoel2Fabric #TashaNoel #christmasquilt

This Pixie Noel 2 Stripes Multi print might be the best binding fabric ever!!! It is so many of my favorite colors with a bias stripe!

A Bit of Scrap Stuff Blog #ABitofScrapStuff #ABitofScrapStuffPattern #EchoQuilt #RileyBlakeDesigns #Quilt #PixieNoel2Fabric #TashaNoel #christmasquilt

I know quilt swirl photos might be so 2020, but I still love them so I have to share it. It is a peppermint swirl of happiness!

A Bit of Scrap Stuff Blog #ABitofScrapStuff #ABitofScrapStuffPattern #EchoQuilt #RileyBlakeDesigns #Quilt #PixieNoel2Fabric #TashaNoel #christmasquilt

It might only be June and I'm not ready for snow, but I am ready to use my Pixie Noel 2Echo Quilt right away! Sometimes creating a winter quilt in the summer is the perfect way to cool down :).

A Bit of Scrap Stuff Blog #ABitofScrapStuff #ABitofScrapStuffPattern #EchoQuilt #RileyBlakeDesigns #Quilt #PixieNoel2Fabric #TashaNoel #christmasquilt

Be sure to follow me on Instagram @ABitofScrapStuff and on my A Bit of Scrap Stuff Blog for more fabric fun!

Echo Quilt Pattern - available at Payhip or Etsy

A Bit of Scrap Stuff Blog #ABitofScrapStuff #ABitofScrapStuffPattern #EchoQuilt #RileyBlakeDesigns #Quilt #PixieNoel2Fabric #TashaNoel #christmasquilt

Have a great day and happy quilting! 

Melanie 
Shop Fabric at Fat Quarter Shop


This post contains affiliate links. Thank you for supporting A Bit of Scrap Stuff. My family appreciates it!


Monday, June 27, 2022

JANOME TUTORIAL: Machine Binding with Janome M7

Hello Quilting Friends! Today I'm sharing today my favorite technique for machine binding! 

I absolutely love machine binding my quilts, pillows, and projects because it is durable, quick, and looks fabulous! This is how I bind 99.999999% of all of my projects. It is the way ;). 

Ready to Learn: Machine Binding

*I'm sewing on a Janome M7 - so your Janome sewing machine screen/controls may look a bit different.

Supplies:


Step 1: Make Binding
  • If multiple strips of fabric are needed - sew 2.5"binding strips together on the bias to make 1 long binding strip. Sewing strips together on the diagonal (bias) creates less bulky seams.
  • Janome M7 settings . A foot, straight stitch, 1.8 stitch length *May also use Dual Feed Holder with UD Foot (walking foot) if preferred
  • Place left binding strip right side up. Then place next binding strip perpendicular right sides together Draw a diagonal line on wrong side of top fabric as shown below.
  • Stitch along drawn diagonal line. Trim 1/4" away from sewn line. Hint- make sure you have sewn your binding strips correctly together before trimming.


  • Press binding strip in half (wrong sides together). Binding strip will measure 1.25" in width when folded wrong sides together


Step 2: Attach Binding to BACK of quilt/pillow/project
  • Attach Dual Feed Foot Holder (walking foot) with 1/4" OD foot attached (top foot in photo). Needle position 1/4", Stitch Length 2.0, and activate Dual Feed button on screen (highlighted in yellow in photo below). I prefer to use my Dual Feed Foot for attaching binding as the machine is sewing through multiple layers (quilt top, batting, quilt backing, plus double fold binding).


  • Starting about 6" from end of binding tail, place binding on BACK of project. Line up raw edges of binding and raw edges of project. Attach/Sew with 1/4" seam allowance until you are about 3" from corner.

  • Mitering Corner of Binding. Draw a line 1/4" from edge of project. Continue sewing until you reach the drawn line. Back Stitch. Stitch off project at a 45 degree angle (see yellow arrow below) - this helps with next step. Cut thread and remove quilt from machine.


Fold binding upwards so edge of binding aligns with edge of project and stitched line from previous step when you stitched off the project at a diagonal to the corner.

  • Fold binding down so folded edge of binding aligns with raw edge of project. Attach a wonder clip to hold binding in position. Begin stitching 1/4" from edge of project. Backstitch. Repeat at all corners to miter.


  • Stop stitching about 10" from beginning. 

  • Overlap binding tails by 2 3/8". Draw line and cut on drawn line. I find a 2 3/8" overlap makes my binding fit best. Traditionally the overlap would be 2 1/2" since that is the original width of the binding.

  • Sew 2.5"binding tails together on the bias. Unfold binding tails. Place fabric on the left right side up. Then place other binding tail perpendicular right sides together. Draw a diagonal line on wrong side of top fabric  as shown below. Sewing binding tails on the diagonal (bias) reduces seam bulk.

  • Stitch along drawn diagonal line. Refold binding and check that your binding is the correct size THEN trim 1/4" away from sewn line. Finish attaching binding with 1/4" seam. Backstitch over beginning stitches to secure start/stop.


Step 3: Stitch Binding to FRONT of Project

  • Change to Dual Feed Open Toe UD Foot, Dual Feed Key selected, Needle Position Center, and Stitch Length 2.0


  • Wrap binding to front of project and secure with wonder clips. Bring up bobbin thread before stitching to prevent thread knot on back of project. Stitch 1/8" away from folded edge of binding.


  • Continue stitching until about 3" away from corner. Fold binding on unstitched side up and hold down. Then fold binding from stitched side over project to create a mitered corner. 


  • Stitch to corner. Raise pressor foot (leave needle in DOWN position). Rotate project. Lower presser foot and continue stitching down binding. Repeat for all mitered corners. Backstitch over beginning stitches to secure. 


Congratulations your project is now bound and ready to be loved!


Be sure to follow me on Instagram @ABitofScrapStuff and on my A Bit of Scrap Stuff Blog for more fabric fun!

Have a great day and happy quilting and stitching! 

Melanie 

Fat Quarter Shop Quilting Fabrics and Supplies


This post contains affiliate links. Thank you for supporting A Bit of Scrap Stuff. My family appreciates it!


Tuesday, June 14, 2022

GO! Finding Home Pillow - free pattern


Hi AccuQuilt Friends! I'm excited to share a sweet pillow: GO! Finding Home. This pillow features the new GO! Bird and Birdhouse die plus it's a free pattern - here.


I love using AccuQuilt dies to cut my fabrics as the pieces are always cut perfectly, which makes it so much easier when sewing the project together!

Accuquilt Dynamic Promo

Supplies:
click on links below

Free Pattern
AccuQuilt GO! Dies


You can also choose to make the GO! Finding Home Pillow into a table topper or mini quilt! Make what is best for your home!


Don't forget to download your FREE GO! Finding Home Pillow Pattern - here


Be sure to follow me on Instagram @ABitofScrapStuff and on my A Bit of Scrap Stuff Blog for more fabric fun!


Have a great day and happy quilting and stitching! 

Melanie 

Fat Quarter Shop Quilting Fabrics and Supplies


This post contains affiliate links. Thank you for supporting A Bit of Scrap Stuff. My family appreciates it!